The thoughts, sewing projects, and fabric oglings of a dedicated sewist.

Goodbye 2015, Hello 2016!

1/4/16
It's here, a New Year. I'm getting back into routine after a lazy, lounge-y holiday with the family. I enjoy the break from regular routine and then I'm hungry to get back to it again, too.

I managed to get a little holiday sewing completed after I finished up the biker jacket for K. No fancy holiday dresses for me, but my handmade presents were well-received and fun to create.

Jalie 3244 Footed Pjs


Jalie 3460 Bella Fit and Flare birthday dress for Mooper


Butterick 5822 Coat for my MIL


She picked out this pop of color for the lining - I like it!


My sewing goals for the year are to make more jeans and outerwear. I'm sure I'll sew up a few jersey tops and dresses for myself in between the challenging projects, but I also want to stretch my skills. Yesterday afternoon I cut out a new pair of Angel Wolf Angel Bootcut jeans and a muslin for the Kenneth King Carefree Fly Front Coat Craftsy course I'm working through, so I'm off to a good start! I've also got some fun client projects lined up for January and February and I'll do my best to share those on this blog. Come find me on Instagram for more regular updates.


Wishing you all a Happy New Year!


Wedding Dress to Biker Jacket Refashion

12/16/15
Whew. Now this was a Project, capital P and all. This was one of those projects that feels a bit like climbing a mountain or running a marathon. For a long time, you can't quite see where the finish line is and you have to stop thinking about it or you'll get too frustrated. One foot in front of another is the way to go. And even when you can start to see the finish line, it takes a long while longer to actually cross it - like the peak of a mountain can seem much closer than it actually is. But when you arrive? When the last stitch is sewn? Ahh, you are rewarded with such a sense of accomplishment. I need the quickie-jersey-top-done-in-two-hour projects as much as the next sewist, but I glow for days when I finish one of these challenges (and because I'm a little bit crazy, this one was a twofer).


If you have been reading my blog for a couple of years you know that back in 2013 I sewed a wedding dress for client K. And if you don't know than you can back track and read about it here. And since I love to show off pictures of it, here it is it all it's glory:


A year after the wedding, K brought the dress back so it could be shortened to cocktail length. 


A year later after that, K had me use the remaining bits and pieces along with leather to create the jacket using Style Arc's Jett Biker pattern. I think this will be the end of the line, since there are very few pieces left (I had to piece together the front panels as I didn't have anything big enough - the lace pretty well hides the seam). The leftover scraps from the dress and three lamb skins (from GorgeousFabrics.com - still in stock) fit in a quart size ziploc bag.

What made this such a challenge? Let me tell you!


It started with a muslin so that I could check fit and practice some of the steps. The fit was perfect out of the box and I'm close enough in size to my client that it fit me, too (bonus!). This is where easy ended.


The sheer number of pattern pieces was part of the challenge here. Each sleeve alone was comprised of five pieces (although the lining only had three). If I'm counting correctly, the outer layer was made up of 19 pieces while the lining involved another 15. Then I decided that everything needed to be underlined (I used twill for K's jacket because it needed a lot more body and cotton batiste for mine) so for each jacket I had to cut out 53 pieces of fabric. I just added that up right now (106 total!) and I'm no longer surprised that it took me two full days just to cut and mark all those pieces!

Trying to cram as many pieces as possible onto one of the skins.

I decided to go full couture so I hand-basted the underlining to the main fabric. I have no idea how long this took me, except that I watched a season of Broadchurch and a few Miss Fisher's Mysteries while I worked my way through the 27 pieces that needed be be underlined (the leather pieces I basted with glue, so they went quickly). My eyes and fingers were sore by the end.

At this point the meticulous side of my personality was in full reign so I decided that every seam needed to be top stitched with a double strand of thread, so each seam was sewn three times.


You can't even see the second set of top stitching but I know it's there.

The construction process was tricky, but luckily The Clothing Engineer has sewn this pattern and provided guidance through her own blog and on Style Arc's website (see links). If you ever get stuck on a StyleArc pattern, check to see if TCE has help for you. The lovely thing about Style Arc patterns is that once you know what to do, everything comes together neatly because the patterns are so well drafted.  The only change I made was to add a hidden pocket in the inside, since the jacket has no pockets and I was afraid that adding them on the outside would mess with the very fitted design.

I'm such a bad blogger that I didn't take very many pictures of my client's jacket - my giddiness fogged my mind. But I have some of the one I made myself. The are almost the same in terms of main/contrast fabric. 


I used a stretch cotton matellasse for the black parts and a wool suiting for the black/light pink parts, both from GorgeousFabrics.com (sorry, both out-of-stock). I have worn my jacket almost every day since I finished and my client seemed equally pleased with hers. Oh, and those jeans I'm wearing? They are the Angela Woolf Angel Boot Cut jeans I made last spring - they've gotten tons of wear this fall, too!

Next up I've got some Christmas sewing to finish before I tackle my next big project, a winter coat. And I have another wedding dress order, so I have more mountains to climb in the new year! What about you? I'd love to hear about your latest sewing accomplishment (and feel free to post links to said accomplishment in the comments).


Happy Halloween!

10/31/15

My husband and I started using those pumpkin stencil booklets that you can buy at the grocery store a few years ago, and we got hooked. At first we just did fancy carvings for our own pumpkins, and the traditional circles and triangles for the girls, but of course the girls started to want the fancy ones, too. They don't have the patience to do them on their own, but they can help (and we are secretly happy when they lose interest and we get to take over).

We learned how to do the surface scraping thing this year and that opens up a whole new set of possibilities!

Belly choose a skeleton hand with cocktail glass -
I'm sure that says something terrible about us as parents!

Mooper's cat

Devon wanted the Eddie face but had to settle for this one.

Pumpkin family!

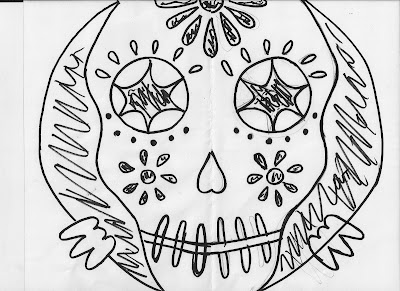
I drew my own stencil this year because I couldn't quite find a Day of the Dead stencil that had all the elements I wanted.

You can download it here, but you will likely need to scale up.

Back in August, Belly received face paints and a couple of face paint books for her birthday. This turned out to actually be a gift for me, since I love following steps (color-by-number sets were always my favorite as a kid). Mooper tried out two different designs for her fairy look (with skirt by me - see? I slipped some sewing in here after all!):


And Devon and I made up something together for Belly's zombie:


We had a fantastic day carving pumpkins and trick-or-treating. Hope your day was as sweet as ours!

Pattern Review: StyleArc Antoinette Pant

10/19/15
I hate to start anything with an apology, but I must say that these photos are not my best work. But if I wait until I can find another 15 minutes to re-take the photos (you know, when light/weather/time all join together to create opportunity), this won't get posted for another month. So you all will just have to live with sub par details and chopped off heads (my expression in a few of these was borderline insane, as in, you all would be sending emails to my husband asking if I'm okay),

So the Style Arc Antoinette is the second pair of trousers I've made for myself but the first I've blogged about. I made jeans back in the spring that I absolutely love and one of these days I'll get around to taking photos that do them justice. The jeans were a breeze to fit (I love you, Angela Wolf Angel Bootcut pattern!), but these required some work. After sewing up the first muslin I almost stopped as I wasn't sure they could be made to look good on me. The best way to describe the look is if you imagine a combination of clown + jockey. Unfortunately, these pictures don't quite capture how ridiculous I looked (go figure, the photos that were supposed to look bad don't look as bad as I felt wearing them).


 Muslin #1 was too big in the waist, hips, and thighs, but too tight around the calves (I couldn't squat without straining stitches).

When I sewed these up I suddenly realized just how impossible it would be to fit them without the help of a friend, so my sewing buddy Nancy and I found a way to trade fitting (knit top for her and these pants for me). Nancy pinned out the side seams, inseams, and center front seam. I then cut a second pair where I also added width to the calf (no tapering at the knee) and about 1" in length. Muslin #2 made me think that I just might like these enough to sew with real fabric:


At this stage, I couldn't tell if the bits I didn't like were due to the fabric (this muslin seemed to grow every time I put it on) or due to the style, but I felt confident enough to cut into this spring-weight Japanese twill I had purchased in a Gorgeous Fabrics' sale.

I'm not 100% sure, but I think I like them!


Please excuse those wrinkles you see across the top of my butt.
Those were caused by a too-long cami. I will hem that cami now
that I have seen how the excess fabric pools across my butt.
I did end up taking the side seams in a bit more from waist to knee. I added another 1.5" to the length, and then used a hem facing to keep almost all of it. If I make these again, I may also slash and overlap under the butt (my husband has requested that I made them more "fitted" next time, but since Style Arc describes these trousers as slouchy, I'm not sure that's a good idea.) I really enjoyed making the pleated pockets and the Style Arc diagram was quite good in explaining how they worked.

For those into sewing geekery, here are the changes I made to the pattern pieces:


I serged the seams, bound the facing edge with Rayon bias tape that I acquired from somewhere (periodically I get handed a bunch of sewing supplies from someone's grandmother's stash), and used wide black quilt binding to face the hems.


The only construction problem I encountered was with attaching and turning the waist facing. There is so much bulk where the pleat and pocket fold overlap that the waist does not want to lay flat in that area, and the facing wants to peek out. For the moment, I tried tacking down the facing in a few places under the pocket fold, but it's not a great fix. I have some red wool crepe I've been hoarding, waiting for the right pattern to come along. I might make another pair with the wool, but I want to figure out the bulk problem first. I also might save the red crepe for Style Arc's Sammi Pants.

So that's the story of this make. I searched high and low for other reviews of this pattern before I started and the only review I found was from Sophie at AdaSpragg.com. She made her version up with a silk charmeuse, so the look is different. I hope this review helps anyone else out there who is considering this pattern!


More cami wrinkles . . .

PHOTO SHOOT OUTTAKE
Here's a terrible photo that makes me think of The Blair Witch Project. After watching that movie, I slept with a bottle of Tilex next to my bed for a week (so that I could squirt bad guys in the eyes from a safe distance), mainly because of the person-in-a-corner scene.


Embracing Mistakes

9/14/15
Greetings! How are things in your part of the world? Fall is creeping in here, although the cicadas are still chirping so summer doesn't quite feel over yet. I love this time of the year, when change is all around us. I'll share one of my favorite poems in a few weeks when Autumn is truly here, but for now I'm enjoying being in in between the two best seasons.

I have a group class starting up this afternoon (machine sewing for kids age 9+) and that has me thinking about all the things I want to teach kids outside of threading a machine, the importance of pressing, and why seam allowance matters. You know, those aspects of sewing that go beyond the basic skills, things like being patient instead of rushing, and challenging yourself to go beyond "good enough" (clip those threads! press those seams! be proud not sloppy!). I think the most important of these extra skills is learning to embrace mistakes.

There is nothing more satisfying the finding your way around a mistake. Of course, getting something right the first time is exhilarating while failing after effort can be deeply frustrating. But rising up above failure? I think we remember those moments more than those of instant success.

Last week I wanted to do a quick project after finishing my Bombshell, which was a skill-stretcher. Angela Wolf's Ruched T-shirt pattern arrived in the last box I received from Wawak (so mad/glad they sell her patterns). I ordered this one after reading a couple of reviews on PatternReview.com and because I had such success with her Angel Bootcut jeans. And this did not disappoint - it fit perfectly almost out of the box. For my first make, I wanted to do the version without a cowl (I've already chosen my fabric for one with). I was a little concerned about the neck binding - it didn't feel right, at least not with the fabric I had chosen. I went ahead and followed the directions and this is what I got:

Ugh. Definitely not attractive! Homemade, anyone?

I walked away from the project for a couple of hours to see what I could think up. I unpicked the coverstitch from the neckline, turned the binding completely to the inside and stitched again. This was better, but because the binding was wide, it kept wanting to flip up and peek out. I thought about unpicking again and reducing the width of the binding, and I also thought about doing a second set with the coverstitch. But the more I stared at it, the more I actually liked how it peeked out. I decided to press the neckline so that it peeked evenly, then stitched over the top row of coverstitch with my regular machine. And this is how it turned out:


So satisfying! I like the added interest at the neckline and I like that it's a bit more scooped (hello little piece of my tattoo!). I actually like this so much that I plan to do it again on purpose.

UPDATE: I later figured out that the binding is supposed to be a kind of mini-cowl, where you lightly twist the "cowl" before attaching it to the neckline. I will try this at some point.

I went into this project wanting an easy, quick project to clear my head after something challenging. I'm so glad I didn't get my wish! I don't mean to say with this post that mistakes and failures always lead to something wonderful. Sometimes we can't figure it out, sometimes it can't be fixed, and sometimes we don't have the skill level (yet) to go beyond. But sometimes when we take a deep breath and try to be curious instead of mad, we find something good.

How about you? When have you saved a mistake?