The thoughts, sewing projects, and fabric oglings of a dedicated sewist.

Showing posts with label jersey. Show all posts

Jalie 2921: Scarf Collar Top

1/21/14
I think this was my first make of 2014 for me.  I've been wanting to make this pattern up since I saw Lauren's version last year.  I love it!


Jalie 2921 - Pattern Cover

One of the things I loved about making this top was the construction steps.  Jalie has you sew the scarf collar with the top inside it (before sewing the side seams) so that the scarf has a nice finish all the way around.  It looked a bit like a sausage when I sewed it up:


You have to remember to leave a gap in one end of the scarf so that you can turn the sausage back into a top (and then slip stitch the hole closed).  I love learning new techniques like this!

I used a super soft rayon blend fabric that I purchased from GorgeousFabrics.com.  I bought the magenta, and now I have my eye on the peacock.  Seriously, this fabric is like wearing marshmallows, without the stickiness.  It's so stretchy that I was worried about recovery, but it's not an issue - it stays in shape all day. And I've washed the top a couple times with no funny business.

See how cozy it is?!
I didn't need to do much with this pattern, fit wise.  I cut a U on top and tapered to a T at the waist/hips. I lengthened the sleeves, because I wanted something that would keep my lower arms warm. And I added clear elastic to the back neck area as well as the shoulder seams because it seemed like a good idea with the scarf. This is my first Jalie pattern and I'm sold!!

I'm not really sure about the tying the scarf into a bow.  Here's my best attempt, and it's not so hot:

This really is a bow, trust me.

 I'm much more likely to wear it in a knot (I'm capable of tying that) or loose like a tie/scarf.


I liked this pattern so much, that my second make of 2014 was a dress, using Jalie 2921 on top and my TNT Sew U Stretch skirt on the bottom.  I'll show you how I did it later this week!

Free Sewing Tutorial: Refashion a T-shirt into a Sexy Dress

7/4/12
I just love a fancy jersey t-shirt.  They are so versatile and manage to be both comfy and flattering.  I collect images of the simple little details that can be added to jersey tops to make them special. 

A couple of years ago I splurged on a Velvet top that I had been eyeing at Garnet Hill.  The color was perfect for a pair of Boden shoes that make me feel fabulous (see here) and I loved the neck detail.  This was before I learned to sew with jersey, so it wasn't something I could make for myself at the time.  Even on sale, it still cost something like $48, but I had some birthday money so I decided to be extravagant (after all, my motto is, "Moderation is all things, including moderation.").

If you are as frugal as I normally am, you can imagine my disgust when the top developed small holes near the front hem after only a dozen washes. 


This top was supposed to last at least a decade!  I held onto it, partially because I paid so much and partially because I hoped to have the skills to do something with it someday.

And now I do!  Keep reading for my tutorial on how to turn a ruined t-shirt into a sexy new dress.


You will need:
*Jersey top/t-shirt
*Jersey fabric for skirt, approximately 1 yard
*3-inch knit elastic (I bought navy elastic from the Etsy shop AC After Glow)
*Coordinating or nicely contrasting serger thread
*2-3 hours of time


Step 1: Cut top to size
Try the top on and hold the elastic around your waist to figure out where you want the waist of the dress to go.  Put a mark on the shirt at the mid-point on the elastic band (you ultimately want the top/skirt seam to hit about halfway down the elastic).  Measure from the bottom of the top to this point and then mark all the way around the top.  I usually do this as a series of small dots:


Cut off the bottom portion of the top.  Good bye holes!


You could make a runched flower with the scraps or use them for embellishment on the skirt or top.


Step 2:  Make skirt
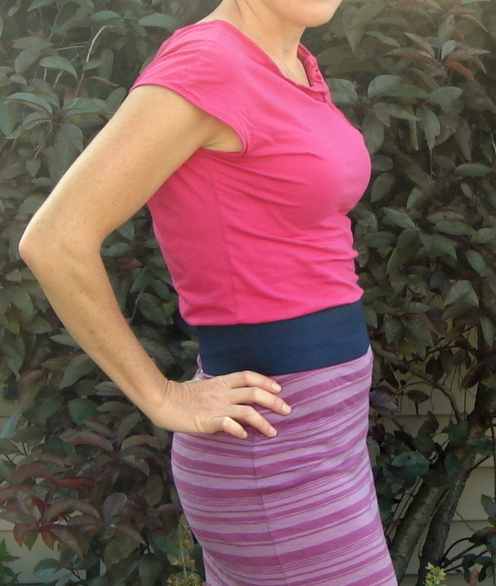
I used a pattern from Sew U Home Stretch by Wendy Mullin.  I cut out the size small skirt but graded up to a size medium for the waist (since I don't really have a waist).  I like this skirt base because it's quite straight and I didn't want a flared bottom.  I decided to go with a fabric with horizontal stripes because with my figure issues (I'm an inverted triangle), I thought it would help balance out my broad shoulders.

I wanted the skirt to be fitted so I choose to go with this pattern. If you want a more flared skirt you could cut out two rectangles and just sew up the side seams or go with an a-line shape.

If you don't have a pattern for a jersey skirt, you could also follow the steps that Rita from Suburbs Mama has listed in her knit pencil skirt tutorial - just don't add the elastic.

Cut fabric and sew side seams.  I used a serger for sewing the side seams but you could also use a regular sewing machine.  For a regular sewing machine, use a long stitch (4mm) or a long zig-zag stitch.  I recommend practicing on a scrap of fabric until you get good results.

Press side seam towards the back.  Use a press cloth to protect the fabric if you are using a rayon jersey.

Step 3: Sew skirt to bodice
With the bodice on top and right sides together, pin and sew the bodice to the skirt.  You may need to stretch either the bodice or the skirt to get the two to fit together.  Don't worry about this - jersey is very forgiving!  Just make sure to distribute the stretch around the circumference of the seam.  I do this by marking the mid-point on the front and back skirt pieces and the front and back bodice pieces.  I then pin at the side seams and at this marked mid-point and stretch as I sew from pin to pin.


Step 4: Cut and sew elastic waistband
Try on the dress and wrap 3-inch elastic around your waist.  Pull the elastic so that it is a little snug and cut 1/2" bigger than this.  Sew the elastic together with a 1/2" seam allowance.  Press open and serge or zig-zag stitch the raw edges.  Turn elastic band to right side and stitch down seam allowance.


If you want to add a label to your dress, add it to the right side of the center back of the elastic.


Step 4: Place, pin and sew elastic
Try the dress on again and wiggle yourself into the elastic waistband.  Place it where you want it on the dress and use a couple of safety pins to pin the elastic in place at the side seams.  Try not to pin the waistband to yourself.


Gently wiggle your way back out of the dress.  Pin the rest of the waistband in place (using regular pins), taking care to distribute the excess fabric evenly. 

Now edgestitch the top of the waistband to the dress, stretching the elastic waistband as you go so that you don't end up with pleats in the fabric.

This was the hardest part for me.  I had to un-pick and re-sew about half of the elastic because the jersey bunched up and moved around under the elastic while I was sewing.  Check frequently as you sew to make sure that the jersey is nice and flat under the elastic and that you are sewing an even distance from the bodice/skirt seam.  I did not sew the bottom of the elastic to the dress because I was worried that the jersey would bunch again.  This has not been an issue as I've worn and washed the dress.

Whew, done!  Good work!

Step 5: Finish hem
Finish the hem by simply serging the raw edges or by serging, turning up, and top-stitching.  I serged the raw edges and did not hem it.

The dress will look pretty blah just laying on the floor so make sure you try it on before you give in to disappointment.  A jersey dress really needs someone in it to look good!


Please let me know if you have questions or notice errors.  I hope you enjoy the results!


What's Up: To Hoochie or Not to Hoochie

6/27/12
I'm back!  We had a great vacation with my dear friends out in rural Pennsylvania.  We fed ponies, went for hikes, played in a creek, checked for ticks, talked and talked and drank wine and talked, and Malinda and I were able to squeeze in two long runs along my favorite trail through the woods in spite of my injured butt.  To spite my injured butt might be more accurate, although I think I know who will win this one in the end.

So the hoochie question . . . I whipped up a dress before I left for our vacation.  It was a crazy idea to sew a dress when I should have been packing AND it was Father's Day, but Devon got even with me by sending Cora up every 5 minutes with some silly question like, "Ask mama where she put the salt." (It was right on the counter in front of him.) Or, "Ask mama where the big container is hiding." (Ditto.)  But is was doable craziness because I was simply refashioning a favorite t-shirt.  I'll write up a tutorial on this one as soon as I can get some better photos, but here's a sneak peek:


Like my attempt at a hoochie mama pose?  I think I look pained . . .


I cut off my head in this one because I couldn't figure out how to get rid of that weird splog in the upper part of the picture.  I love the 3-inch elastic on this because it makes me look like I have a waist (I don't).

The dress turned out a little more "fitted" than I intended but it has grown on me (ha!).  Devon thinks I should make six more like it!

I finished off Catlin's order on Monday evening (1 new skirt, 3 re-worked skirts, 1 dress and two tops) but I was in such a hurry to get it to her that I forgot to take pictures.  Dumb dumb dumb.  I'll try to find a way to snap a few when I drop her last thing off.  I really want to show you the horizontal peating with contrast fabric that I used to fix a skirt that was too short.  Thank you, Boden, for giving me another idea to steal!

My client Jen gave me a challenge a few months ago.  She has an unused bumper (as does every other family with children) that she wanted to turn into something she could use.  We decided on a pillow, and then Jen sent me a picture of a cute little owl pillow.  So here's Owl #1 from the bumper:


I'm going to make two friends for this little gal this week as Jen likes things in threes, all slightly different.  I based the design on a tutorial from Make It and Love It.  The only problem with making things like this is that now Maisey and Cora want their own!  I guess I know what I'll be doing with our unused bumper.

This week I'll be finishing up the owls and making a muslin of Spencer's six-panel skirt.  Hope you all have a great week!

What's Up: New Dress, New Service!

6/4/12
I mentioned in my last post that I made a new dress for myself.  It's a Simplicity 2580 in jersey fabric that I bought from EmmaOneSock.com. I love this pattern!

Pinned Image


I made version C but I omitted the sleeves:


It came together easily with my serger - I think from start to finish it took about 4.5 hours, and this includes the time it took to trace the pattern and cut the fabric.  I cut the fabric as I sewed so that I wouldn't have to deal with too much curling, but the fabric stayed quite flat so I probably didn't need to do this.  Going down a size from my measurements was about the right fit and the only adjustment I made was the take in the dress at the center back seam so that it hugged my back waist a bit more.  One of the details that I like about this pattern is the use of a loop to go from a cowl neck (version B) to a v-neck (version C).  Like this:


I was also interested to see how the cowl neck was constructed - it's actually a doubled piece that mirrors itself.  After it is cut you simply fold it in half to make the front bodice.  This gives a bit more coverage in the front and also eliminates the need to finish the front neckline.

I didn't match the print across seams on this one but I did try to be intelligent about how I cut it out so that the print would blend.  I plan to make this again as a top and I think I'll try the halter version (E & F) as well.  I like that this pattern makes a great boppin' around dress but would also work well as a sexy cocktail dress.  I've already got one order for this dress from a client and a second is thinking about making the plunge!

I tried something new this week in working with a client.  Bryn ordered two skirts earlier in the season (see here) and was feeling a bit unconfident about matching them with her existing tops.  So I offered to come over and go through her spring/summer clothes to see what we could find.  So on Saturday afternoon Bryn cracked open a bottle of wine and I had her try on skirts and tops and dresses.  I was looking for three categories of clothing: 1) pieces that were due for retirement, 2) pieces that could be mixed/matched differently, and 3) pieces that needed help before they would work.  I only found one thing in the 1st category for Bryn (a drab Ann Taylor skirt that had lost all shape) but we found lots in category 2 and 3.  Like most people, Bryn isn't just one size, so she has lots of tops that need to be taken in at the waist so that they fit better.  She also had a great Boden dress that somehow made her look matronly.  But when we adjusted the shoulder, it suddenly looked sexy!

I've been doing this alot lately with my own wardrobe - altering for size or altering for style.  It's a great way to cheaply breathe new life into your closet.  I think everyone has pieces in their wardrobe that they've been hanging onto because they love them even thought they don't quite work.  I love the fun of thinking creatively about these pieces so that they can be fulfill their potential.

This week I'll be finishing off Denise's skirts and Catlin's summer wardrobe.  I also plan to start Ann Marie's skirts once the fabric (finally!!!) arrives.  I've got some reinforcements coming in to help with the girls (thanks, Dad!) as I have a lot I want to get done before my vacation on the 18th.

Hope you all have a great week!

Free Sewing Tutorial: Draft a deep cowl neck top

5/3/12
UPDATE: I've added a post about drafting a facing for this cowl neck here.

My tutorial on drafting a high cowl neck top has had a lot of pageviews in the last week (this always makes me happy).  So at the request of at least one reader (see? that's all it takes with me!), I'll show you how to draft a cowl neck top starting with a pattern that has a dart.  This will produce a deeper cowl neck like this one:


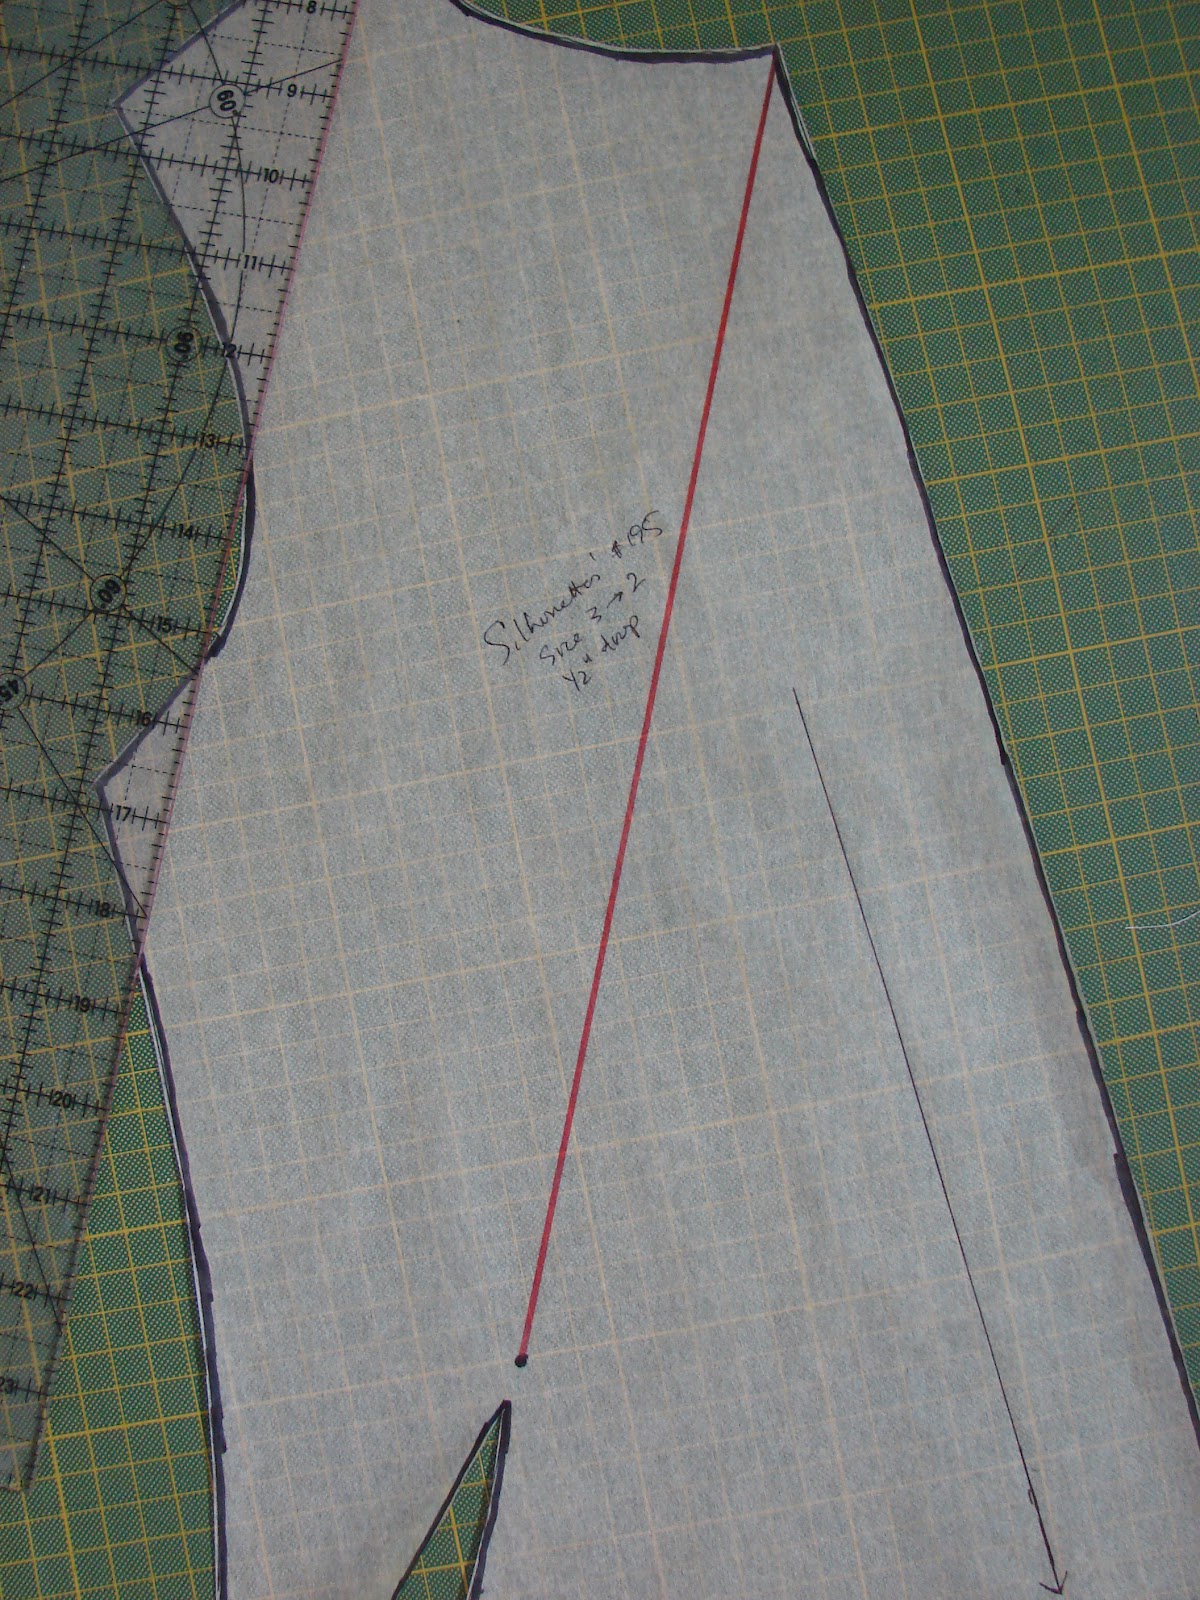
I started with Silhouettes' Pattern #195 as I have already made alterations to the pattern for a good fit (changed shoulder slope, took in waist/hip as they are smaller size than my shoulders).  It has a French dart, but these instructions should work regardless of where you dart is placed.

And I need to give a big thank you to Peggy Sagers for her help in figuring out how to draft this pattern (from Silhouettes).  I took a couple of classes with her at the sewing conference I went to recently (Original Sewing and Quilting Expo) and she encouraged people to contact her with questions.  So when I was trying to figure out what to do with the dart, I emailed her.  Within a couple of hours I got a very helpful response.  And this was on a Sunday.

Materials
*1 - 1.5 yards of drapey fabric with stretch (jersey, knit, stretch charmeuse, maybe even stretch poplin)
*Tracing paper (I use Bienfang Canary Sketching and Tracing Paper, the 50 yard/24" roll)
*Clear ruler
*Top/bodice pattern with a dart


Step 1: Move dart to neckline.
Trace your orginal pattern onto another sheet of tracing paper as you'll need to do a lot of cutting.  To move the dart to the neckline, draw a straight line from the dart point to the center front neckline.


Now cut along this line until you are about 1/8" away from the dart point (this will be your "hinge"). 


Now close and tape the orginal dart which will cause the pattern to spread at the new dart point.  It should look like this:


All right!  Step 1 is done.  You have moved a dart!


Step 2: Cut & spread neckline
Draw a curved line under the neckline, 1.5 inches down from the original. Cut along this line until you are about 1/8 inch from the shoulder line.

Draw two lines that meet at a right angle on a new sheet of paper. Place your cut pattern piece along the top line on this piece of paper. Spread the neckline so that both points touch the top line. Angle the remaining bodice so that the bottom center front corner touches the side line. Tape into place.  If that sounds confusing, it isn't - I think it's just easier to understand with a picture:


Smooth out the angle created at the shoulder line:


(Please ignore the second layer of pattern - that was my first try and it wasn't correct so I just taped take 2 over the top.)

Step 2, check!


Step 3: Turn half pattern into full pattern
You need to cut on a bias for this design, so you will need a full instead of a half pattern. Take a big piece of tracing paper and draw a T with lines meeting a right angles. Trace your half cowl neck pattern onto one side of the T and then flip and trace it onto the other. It should look like this when you are done:


I know this looks like something that would never fit a human body, but trust me, it will work!  And please ignore the wide band in the middle - I had to tape two pieces of tracing paper together to get one that was big enough.

Good work - the hard parts are all done!

Step 4: Place and cut your fabric
Spread out your fabric. Place the front pattern piece on the bias and the back pattern piece on the straight grain. It will look like this:


Cut and sew the top as you would normally.  You can serge the edges, turn them under by 1/4" and topstitched them into place or leave them just serged for an edgier look  You can add any kind of sleeve or even a hem band.  This top will fit and look great.  Devon calls this my sexy top and looks suspicious when I wear it out with friends!


Free Sewing Tutorial: Draft a Cowl Neck

4/19/12
UPDATE: I added a tutorial for drafting a facing for a cowl neck top here.

UPDATE: You can find a tutorial for the deeper cowl neck here.

I have a simple t-shirt/shell pattern that works well for me but I have enough basic tops - I want something fancier!  I love the high cowl neck look that is going around these days: 

Pinned Image
DKNY from macys.com
Pinned Image
LRK from saksfifthavenue.com

I wanted to make this look without having to shell out money for a new pattern and I couldn't find a free tutorial online that was really what I wanted.  So I hid out in my sewing lab and figured it out!  I use a lot of online tutorials in my sewing so I'm always happy when I have something to share with all of you.  Here's what I created:


Materials
*1 - 1.5 yards of drapey fabric with stretch (jersey, knit, stretch charmeuse, maybe even stretch poplin)
*Tracing paper (I use Bienfang Canary Sketching and Tracing Paper, the 50 yard/24" roll)
*Clear ruler
*Top/bodice pattern that you like (if you don't have one, there are plenty of tutorials online that will show you how to create a pattern from a t-shirt or top that you have in your closet, like this one).

Step 1:  Cut & spread neckline
Trace your front bodice/t-shirt pattern onto a new sheet a paper; you need to cut the pattern so you don't want to ruin your master.  Draw a curved line under the neckline, 1.5 inches down from the original.  Cut along this line until you are about 1/8 inch from the shoulder line.

Draw two lines that meet at a right angle on a new sheet of paper.  Place your cut pattern piece along the top line on this piece of paper.  Spread the neckline so that both points touch the top line.  Angle the remaining bodice so that the bottom center front corner touches the side line.  Tape into place.  This sounds harder than it is so don't fret!  It should look like this:


Smooth out the angle created at the shoulder line:


Step 2: Turn half pattern into full pattern
You need to cut on a bias for this design, so you will need a full instead of a half pattern.  Take a big piece of tracing paper and draw a T with lines meeting a right angles.  Trace your half cowl neck pattern onto one side of the T and then flip and trace it onto the other.  It should look like this when you are done:


It looks a bit odd, doesn't it?  Trust me, it works!  Imagine that super wide neckline draping in the middle because this is what will happen.  (Ignore the wide band in the middle of my pattern piece - my tracing paper wasn't large enough so I had to tape two pieces together with masking tape.) 

Draw a new grainline that is at a 45 degree angle to the center line.

Step 3: Place and cut your fabric
Spread out your fabric.  Place the front pattern piece on the bias and the back pattern piece on the straight grain.  It will look like this:


Cut and sew the top as you would normally.  I have left the edges serged and turned them under by 1/4" and topstitched them into place - your choice.  I added a band to the bottom for this top but you could do a simple hem or leave the hem unfinished.  However you finish it you now get to glow with pride everytime you wear it because you drafted the pattern and put it together on your own!


I also drafted a cowl neck from a pattern that had a bodice dart which made for a deeper cowl.  I'll post instructions for how to do this if there's interest - leave a comment if you want it!


Credit:  I generally followed instructions I found in Adele Margolis' book Make Your Own Dress Patterns.  I strongly recommend this book if you are interested in learning about drafting patterns.

What's Up: Success in the Knit/Jersey Laboratory, Skirts, Little Bits Workshop

4/17/12
Greetings!  This last week was a good mix of drafting new patterns AND sewing them into something wearable.  I'm excited to share the things I've made and I'll be posting a new tutorial later in the week.

First: my mad scientist work in the knit/jersey laboratory is starting to pay off.  I've been working on adapting a t-shirt pattern I have (Sihouettes #195) into a cowl neck.  It took three drafts but I finally got it right, at least on paper.  I wanted to wear something new and handmade for a night of cocktails and speaks with my good friend Candice.  Candice is crafty (she's the lovely person who did all the hard work on setting up my blog and she has her own blog over at Candoodles) so I knew that she could appreciate the work!  Here's how cowl neck #1 turned out:


While it took hours and hours of drafting work to figure out the pattern, the top only took 45 minutes to cut out and sew.  I used a metallic steel jersey that I bought on clearance at fabric.com for $2.39 - a small price to pay to feel spectacular at the Green Mill with Candice!  The fabric called for an edgier look, so I finished the hem, sleeves, and neck with a serge stitch to leave them looking a bit raw.  The fabric is black on the wrong side and I like how the black peeks out at the neck.  This is a deep cowl, which I like, but I also wanted to have a short/high cowl neck.  Devon had some friends over for a poker game on Saturday night and I spent my time drafting the pattern for and then sewing up this top:


I wanted these edges to look more finished since the fabric is so pretty, so I turned under and top-stitched the arm and neck and added a band to the hem.  I found this fabric (my best guess is that it is a stretch charmeuse) at the Economy Shop and I got 5 yards of it (60" wide) for $3.50!

I'll be posting a tutorial for the high cowl neck top a bit later this week so come back if you want to DIY.

I had a bit of time on Sunday afternoon so I worked on the Dolman Top with Banded Bottom tutorial from Make It Love It.  Here's how it is supposed to look:

Pinned Image

Cute, huh?  My first effort a few weeks back was too small (I forgot to account for the negative ease in the top I copied):


My second effort is closer but a little too baggy for my taste:


I think I'll cut off the band and try again by making the bottom band wider and snuger.  I'll probably re-do the neck band as well as I think it could be neater.  I do have to say that I LOVE sewing jersey now.  I like working on more challenging projects but it's also fun to make a top in an hour!


During the week I worked on skirts for Bryn and Domenica and I should be able to finish them up this week.  I added a blue band to Bryn's skirt and I like this mix of colors:


For Domenica's skirt I got to draft a pocket and a slim waistband (but still curved - no more rectangles!):


And finally, on Saturday I attended a gathering of crafters in River Forest.  Liita, who owns and runs The Little Bits Workshop, is hosting a Trunk Show for local crafters and artists.  Think Renegade but much smaller in scale (for now) and plenty of parking.  Liita has found a great mix of crafters (many of them local Berwyn-ites) with tons of talent.  I look forward to teaching some classes through the workshop this summer and I'm excited to see what we can do with the trunk show.  I'll post more info as we get closer to the date (May 12th - just in time for Mother's Day!), but you can get a preview here:  Little Bits Trunk Show.

Then to crown the week, I went to the zoo with my brother (in from Seattle) and the girls yesterday.  Look who we saw:


They put all of my efforts at creating some pop to shame!

Up next: I want to finish at least one each of Bryn's and Domenica's skirts this week and get their second skirts done next week.  I also hope to find some pockets of time to make small items for the trunk show.  Wish me luck!