The thoughts, sewing projects, and fabric oglings of a dedicated sewist.

Showing posts with label pencil skirt. Show all posts

Doubleknit Starburst Heaven

2/6/15
You know when you sew something that you've been thinking about for a long time and you really hope it lives up to your expectations? And sometimes it doesn't? This dream turned out to be everything I hoped for and more. If you see me on a regular basis please be advised that you'll be seeing this skirt A LOT.

Here's the photo that hooked me in:

113c_style_original_large
Source
Pencil skirt? CHECK
High waist? CHECK
Sexy detail? CHECK
Killer shoes? DOUBLE CHECK

My only disappointment was that the shoes didn't come with the pattern. What? I know. That should be an option.

So I've had my eye on this pattern for a while. But it's BurdaStyle, so even thought it's only one pattern piece I still had to tape together 24 pieces of paper, and I rarely have the patience for that. And it's BurdaStyle, so there could be some glaring problem with the instructions. But it's also BurdaStyle, one of the few pattern lines that does sexy. And it's an easy-peasy, knock-it-out-in-two-hours skirt. Too bad it only took me about a year after buying the pattern and six months after buying the perfect fabric to make it up.

I did have a few hiccups making this up which I'll fix for the next time - and there will most certainly be a next time - but I love the results.


Let's talk about construction, because I made some changes. First, I added a zipper. BurdaStyle's idea is that you would pull this skirt on, with it high, fitted waist, over your hips (although I supposed you could wiggle in head first). I wasn't sure I would be able to pull it on, and I figured if I did, the waist would sooner or later get all distorted. So I inserted a zipper in the side seam without pleats. I think next time I'll add a center back seam and put it there, partly because I don't love side seam zippers, and partly because I really think this skirt needs a back vent if you want to easily get in and out of cars with it. Especially if you're gonna wear some killer heels, which I most certainly will, and you don't want to look like a landed sea mammal while you attempt to enter a car door.

Also, this skirt is supposed to have pleating in the back. I wasn't sure this was a great idea, but I planned to go along with it. But that pleating was just too damn thick - I could barely sew through one side of pleats much less two. I did use a doubleknit instead of a ponte knit, but it don't think that would make a huge difference. Check out how thick the seam is with an unpleated back:


You can see the skipped stitches and wonky overlock that occurred as my machines fought their way through this manwich of layers.

Also, I think the directions have you pleat in the wrong direction. As a result, my pleats lay with the pleats down, but then when I walk they flip up. Next time I'll try reversing this.

To get an un-pleated back, I simply used my skirt front as a pattern once I had nailed sewn the pleats in place. 

My final change was to take it in about 1" in the waist, as I wanted a good amount of negative ease to hug the waist to my body. I catch stitched the waist facing down in a few areas and I catch stitched the hem after adding a bit of teal hem lace (ooo-la!).

Some may think my pairing this with a plum top is odd. I kinda like the oddness, and this blouse is one my husband bought me last year for Christmas and I haven't found a way to wear it yet (I don't usually look good in blouse-y blouses, but the high waist really helps). My plan is to pair this with a teal top, similar in color to the hem lace. Color theory tells us that red and green are a good pairing, and I've wondered how to pull this off without looking like a crazy Christmas person.

Over the holidays, I went on a junky Crime tv bender and watched the entire first season of Reckless. It's not great, but it's what I wanted at the time. And one week, Anna Wood showed up in a teal top and red pencil skirt and it worked! Red and green (ish) looking fab and un-Christmas-y together. 
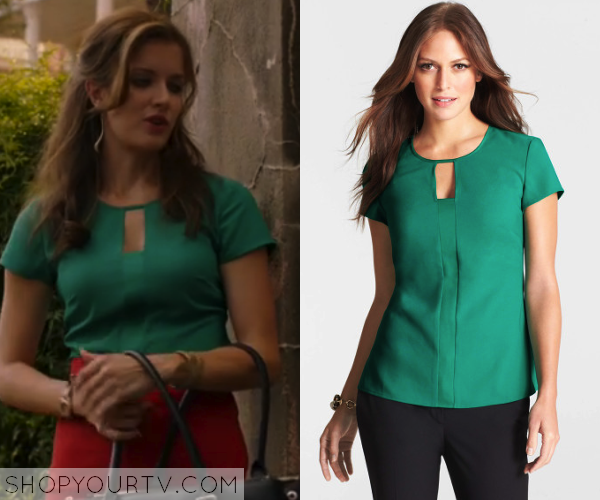
s
Source
Hard to see it in this photo, but it's the best I could locate. I really want to replicate this in some way (I'm thinking cowl neck jersey top) and I think I have the perfect fabric:


What do you think? Would you wear this color combo?

Bye!


Quickie!!

3/19/14
I've got a couple of projects that I am excited to show you, but they are awaiting final finishing touches and photographs. In the meantime, here are a couple of curvy knit pencil skirts I've made up for clients recently. One was finished a couple of months ago and the other finished today. Please feel free to refer to my free tutorial on this design if you want one for yourself!

Brown double knit from Mood and printed ponte knit from GirlCharlee (out of stock)

Rayon double knit and Croco Embossed Black Novelty woven fabric -
both from GorgeousFabrics.com


Graphic Studio Faro Pencil Skirt

10/17/13
Sometime back in the summer I agreed to be a pattern test for Studio Faro's Pencil Skirt Worksheet.  I finished my muslin in late August or September, but then the wedding dress took over.  All along I planned to make up the skirt using this fabric, and when I saw that the challenge this week on Project Sewn was for a graphic print, I knew I had to get busy.


I like having bold prints or bright colors on my lower half as it provides a balance for my broad shoulders. This fabric is a stretch cotton sateen from GorgeousFabrics.com, and it's on sale this weekend!

I used some of the techniques I learned while making the wedding dress, a combination of instruction from Rhonda Buss, Susan Khalje, and Gertie Hirsch:

Underlined the waistband with flannel and organza and added spiral steel boning.  I also drafted the skirt with a 2-inch contoured waistband, because I like it like that.

Installed a waist stay to keep the skirt in place (I walk fast and my side seam often ends up a center front).

Why not magenta?

Put drapery weights in the back vent to keep the corners from flipping up (I like how the weights tap the back of my knees when I walk) and finished the hem with lace and a blind stitch.


Installed the zipper by hand with a pick stitch so that I could better match across the seam.


I used one of my favorite buttons from my button collection.  I found this at a thrift store where it was the only one of it's kind - perfect for a skirt!  Isn't it a beauty?


I've drafted pencil skirts before but Studio Faro's directions were a bit different than I had seen previously. The thing that most amazed me was the perfect fit on the butt!  When I've drafted skirts using a different method, I usually have to play around for ages to get this fit:


I tweaked the fit a bit between the muslin and this skirt by taking in the side seams a titch, as my muslin was made with, well, MUSLIN, and my fashion fabric was a stretch cotton sateen.  I'm really amazed how well this came off the drafting table!


I should have some finished wedding dress photos to show you soon and I plan to write a "what I learned" post about the whole experience.  Next up: Gertie's wiggle dress for a client!

Free Sewing Tutorial: Curvy Color Block Ponte Knit Pencil Skirt

10/2/13
After the disappointment of the Elisalex dress, I wanted to sew something that would cheer me up.  I'm going back to the Elisalex dress soon (I will not be vanquished by thee, Madam Elisalex!), but in the meantime, sewing with knit/jersey fabric is fast, easy to fit, and (usually) highly satisfying.

I love making variations on my TNT patterns.  I consider the patterns in Sew U Home Stretch my knit block patterns, as they are simple, I know they fit, and they are easy to draft from for making variations.  I'm working on a woven dress block so that I can draft variations there, too, but I'm still perfecting the muslin.  But my knit block pattern was all I needed for this project. 

So, please meet THE CURVY COLOR BLOCK KNIT PENCIL SKIRT!!


I based this design on my corsetted pencil skirt, which has been really popular with clients (I think I've now made this skirt for five different people).

And because I like y'all so much, I'm going to show you how to do it.

TUTORIAL

Supplies
Knit skirt block with waistband
2 or 3-inch elastic
Ballpoint/stretch sewing needle
Tracing/drafting paper (you need to see through it)
Medium to heavy weight knit fabric - I used two ponte knits from GorgeousFabrics.com
Lining fabric (optional - I used a knit tricot)
Seam gauge or measuring tape
Ruler

Draft Color Block Skirt
STEP 1: If you don't have this marked already, modify your skirt block to a pencil skirt.  I have a mini-tutorial on this here.


STEP 2: Take pencil skirt front pattern piece and place marks 3 inches in from the side seam all the way down to the hip line. UPDATE: For larger sizes, I have found that it's best to measure in thirds. You want the color block inset to take up about two-third of the skirt. On your quarter-block, measure across the waist and hip lines. Divide these numbers into thirds. So if my quarter-waist measurement is 8, I would place a mark about 2.75 inches in from the side seam at the waist. If my quarter-hip measurement is 11, I would place a mark at 3.75 inches from the side seam at the hip.

STEP 2: Place a mark 5-6 inches in from the side seam at the hem (remember to mark in from the pencil skirt line if you have simply drawn that on top on your regular block).  Using a ruler or other straight edge, draw a line between this mark and the 3-inch mark at the hip line.

STEP 3: Connect dots, smoothing out line at the hip.  Feel free to play with the line to make it more curvy or straight. If you have a French curve or hip curve, use it!

STEP 4: Repeat with pencil skirt back.  Your skirt blocks should now look like this:


STEP 5: Use tracing paper to trace your four new pattern pieces (center front, side front, center back, side back).  Make sure to add a grainline on the side front and side back pieces.  I do this simply by measuring over from the center front/back fold.

STEP 6: Add seam allowance to all your pieces.  I usually use 1/4" or 3/8" on knit fabric when I have already tweaked the pattern for fit.  Since I wanted a 3-inch elastic waistband and my skirt block only allows for a 2-inch waistband, I marked 1 inch lower on the waist to remind myself to cut there.  Your four pattern pieces will look something like this:


Hello, Toes!


Cut and Assemble Skirt
You probably already know how to do this because you've made this skirt before, but I'll walk through the steps in order to highlight how to sew this new shape.

STEP 1: Cut skirt and waistband pieces.  If you aren't sure which side of a solid knit/jersey fabric is the "right" side, hold onto the selvedge sides and pull across the cut edge.  The fabric will roll to the right side.  If you are using 3" elastic, the size of the waistband will be (your waist + 3/4") x 7".  For 2" elastic, the width will be 5". This allows for a 1/4 - 3/8" seam allowance plus a touch extra.

For my waistband, I wanted the color block design to carry through the waistband.  I cut four pieces (center front, center back, two sides) and just measured the top of the skirt color block pieces to know how wide to make each section.

Note: Place a mark at the hip line on your center front/back, and side front/back pieces.  This will make it easier to match up the skirt pieces in the next step.

STEP 2: Pin and sew front/back side pieces to front/back center pieces.  This step might feel wrong when you are doing it, as you'll be matching a concave curve to a convex curve.  Pin the hip mark first, then top and bottom, then the rest.  Feel free to use a lot of pins on the curves (I did).  You'll notice that the fabric won't lie flat - that's okay (see third photo).  As long as the fabric is flat within your seam allowance (this is why having a small seam allowance is helpful), all will be well in the end.


If you have a walking foot, this is a good time to use it.  I like to sew with a long stitch on my regular sewing machine then serge over the seam with my serger.

Press seams - this should take out any remaining ripples.

STEP 3: Pin and sew side seams.  Place front section on back section, right sides together, matching hip marks.  Pin and sew with long stretch stitch on sewing machine or with overlock stitch on the serger.

STEP 4: Sew waistband.  Fold waistband right sides together, matching short sides.  Pin and sew.  Press seam open or to one side.  Fold waistband in half along long side and press.

STEP 5: Attach waistband.  Divide skirt into 8 equal sections and mark with pins.  Divide waistband into 3 equal sections and mark with pins.  Place waistband over skirt, right sides together matching pins.  Pin in place.  I like to have the waistband seam at center back.  Sew around waistband leaving a 2-3 inch opening at center back to insert your elastic.  You may need to stretch the waistband slightly as you sew to match the skirt.

If you have a color block waistband, then you'll simply need to match up the sections.

STEP 6:  Cut and insert elastic.  Hold elastic around your waist to determine how long you want it.  The elastic should be slightly stretched.  Overlap by 1/4 - 3/8" for seam allowance.  Attach a safety pin to each end.  Use one safety pin to feed the elastic through the waistband and use the second safety pin to secure the other end to the skirt (so that you don't accidentally pull it all the way through - very annoying).  This is harder to do with 3" elastic, but you'll get there.  Once the elastic is all the way through, overlap the ends and pin.  Sew ends together with a zig-zag stitch and trim off excess elastic.

STEP 7: Finish skirt.  Pin opening on the waistband to the skirt and finish this seam.  Try on the skirt and determine where you would like the hem.  Fold and press hem allowance and stitch the hem.  You can stitch the hem with a straight stitch, zig-zag stitch, blind stitch, or coverstitch (I used the coverstitch on my serger). Now put on the skirt and feel curvy!


I don't know why I am looking up, unless I'm worried about
bird poop - that tree behind me is full of birds.

My attempt at looking curvy.

And finally a word on the fabric I used.  I bought this ponte knit over a year ago from GorgeousFabrics.com thinking it would make a fun pencil skirt.  When it arrived, I liked it, but the thought of that bold, strong print swaddling my lower half was too much.  It sat around in my stash and I'd look at it every now and again and think, "How do I tame you?"  Finally this design idea came to me.  It was a "duh" moment (no angels singing opera) since I've seen about a million color block options online and this silhouette has been in my arsenal for a while now.  But I'll take "duh" for inspiration.  The black fabric came from GorgeousFabrics.com and you can find it here.  I lined the skirt with a black knit tricot that I also purchased from GorgeousFabrics.com (this isn't in stock but they have other knit linings).  I thought long and hard about where I placed the print on for the front and back pieces - I did not want to shine a spotlight on certain anatomical features!

Let me know if you have any questions and I'll add more construction photos the next time I make this skirt - I'm already scheming to make another version with this fabric (ponte knit and yes, it was also purchased from Gorgeous Fabrics - you can tell where I do most of my online shopping!):


If you make your own version of the skirt, please send me a picture or a link to your blog - I'd love to feature it!

A Few Finished Skirts

1/16/13
I finished up a few client skirts last week that Carol started for me before the holidays.  My process with Carol has been that I draft the pattern, she cuts the fabric and bastes the skirt together, then I do the fitting and finish it off.  So far this has worked well and it allows me to get skirts out the door a bit faster.

I think Carol did a stellar job using the fabric print on these first two skirts.


This is Kendra's straightforward yoked a-line skirt and the fabric is a stretch poplin I bought from Fabric.com ages ago.  Don't you love the colors??!  Because the yoke is curved, we decided not to try to match the print there.  My instructions to Carol were something like, "Be thoughtful about how the print comes together at the yoke line."  Yep, that's me, super helpful.  And I love what Carol did!


This second skirt is Lisa H's gored a-line using some kind of stretch drapey twill I bought from GorgeousFabrics.com.  Because the skirt has six panels, we knew we couldn't match up the print across the seam lines or we'd run out of fabric (I had three yards, but it was only 42" wide and the skirt is long).  Carol and I took a look at the fabric together to figure out how best to use the print, and Carol came up with the diagonal idea.  When she went to cut it out, she didn't have enough fabric to continue doing this across that back, so genius struck and she reversed the direction for one panel.  Nice, huh??!

Front
Back

This last one took me a while to figure out how to draft.  Lara wanted a pencil skirt with a front pleat, but I didn't want to do panels because the wool had a somewhat looser weave, and I was worried about it getting all stretched out of shape.  I spent a good hour or so reading through the Adele P Margolis book, Make Your Own Dress Patterns, and finally came up with the ideas of inserting a side pleat that ran from the top of the skirt to the bottom, that is sewn shut until about 7 inches up from the hem.  The pattern piece looks kinda crazy:

with pleat un-pleated (disregard length difference between two halves)

with pleat pleated


The lovey wool fabric is from a haul I bought from a woman selling off her stash (thank you, Craigslist!).  I've had this lovely button (from the Eonomy Shop) in my stash for a couple of years now and I'm glad it finally found it's place.  I knew there was a reason I didn't use it earlier!


Finally, I'm happy to report that Mooper eventually decided that she likes her birthday dress (she wore it three days in a row until I insisted that it needed a wash). 


And check out the pink cowboy boots that Grandmother gave her!  Yee-haw!!

How Much Coral is Too Much Coral?

10/26/12
I have been having a grand time these past few weeks.  After months of practicing skills I am already comfortable with, I've learned three new ones in the last three weeks.

Bound buttonholes . . ..


waistband boning . . .


and an underarm gusset (still in muslin form)!


My fellow Gertie readers will note that all of these skills came from Gertie's New Book of Better Sewing.  It arrived about two months back along with a copy of the September Threads magazine, so you know that was a banner day in the PoldaPop household.  Or at least for me.  I think I spent the rest of the day ignoring requests for milk and goldfish and attention in general so that I could scan the pages, plot my new Gertie wardrobe, and read about drafting a peplum.


The first project I wanted to do was the Bow-Tied Blouse.  It looks so sexy in a sexy-librarian sort of way. 


And who doesn't want buttons all down her back like Miss Mary Mack??  I also thought it would work with fabric I picked up from GorgeousFabrics.com with a skirt/top combo in mind.  I had seen this Hart's tutorial for making a stretch lace skirt, and I immediately wanted one for myself.  I love bright coral (I saw it on Belly earlier this fall and it looked so lovely next to her dark brown hair that I wanted it next to mine).  I am slightly nervous that with the skirt there's a little too much coral, but if I'm honest I don't really give a damn what anyone else thinks about this.


I found the buttons at The Economy Shop (favorite thrift store). 


I was immediately attracted to them because they look like Werther's Original Hard Candies.  In my late 20's I went through a Werther's phase (I may just love caramel more than chocolate) until I went to the dentist and had 11 (yes, shocking, I know) cavities, when I'd never had a cavity before.  Paying for the fillings cured me of my Werther's addiction, but I'm glad I get to at least remember the flavor whenever I wear this top.  I also liked that the color clashed a little with the pinky coral. 

I am mostly happy with the way the top turned out, especially since I didn't make a muslin or adjust the pattern in any way.  When I make it again, I'll add 1.5 inches to the length so that I feel more comfortable wearing it with low-ish rise jeans.  There's also some extra fabric in the front.  I'm wondering if my more experienced sewing friends can tell me if this is what a top looks like when it needs a SBA? 


Just so you don't think I spend all my time sewing selfishly (I only sew for myself on the weekends, promise!!), I can also report that I've completed a couple of skirts for clients and I've got a couple more awaiting fittings.  I forgot to take a picture of Melissa's pencil skirt (Melissa: can you send a picture, please pretty please??)  but I do have one of Liz's skirt:


This is a high-waisted denim pencil skirt with homemade bias tape along the hem.  And now I'm thinking that I want to add boning to my next high-waisted denim skirt.  I'm itching to get out the wire cutters and pliers again . . .