The thoughts, sewing projects, and fabric oglings of a dedicated sewist.

Showing posts with label DIY. Show all posts

Almost Fall Easy Summer Dress

9/9/14
Remember when I said I had an idea for taking my copy of the summer RTW dress and making it with jersey? A couple of weeks ago I pulled it off, and I love how it turned out!

This is me, attempting an Oona-esque shot.
I used the skirt from the Easy Summer Dress, and then adapted my Wendy Mullin Sew U Home Stretch bodice by turning it into a deep V-neck. With the right bra, this neckline is a bit dangerous (mrow).


That's right, I'm dangerous. Watch out.
 The fabric is from GorgeousFabrics.com, but it is sadly out of stock. It's a thick, slightly sweatery jersey and I fell for the colors (more magenta, please). I hope it can be a good transition dress as it's starting to cool off here in the Midwest. As I was cutting it out, I got really excited about the stripey action in the selvedge. I wanted to use it somehow (hem? neck? create some kind of cording?) and finally decided to use it to bind the sleeves and neck. I wasn't sure how this would work as it had ZERO stretch, but I like the way it turned out.

Button is covering the joint.
So not much more to say about this one, except that my Sew U Home Stretch book has certainly turned into a good investment. It's my go-to whenever I want to create something new with knit/jersey. What about you? What are starting to sew for fall?

I'll leave you with my figurehead shot. I'm a ship!


Free Sewing Tutorial: Curvy Color Block Ponte Knit Pencil Skirt

10/2/13
After the disappointment of the Elisalex dress, I wanted to sew something that would cheer me up.  I'm going back to the Elisalex dress soon (I will not be vanquished by thee, Madam Elisalex!), but in the meantime, sewing with knit/jersey fabric is fast, easy to fit, and (usually) highly satisfying.

I love making variations on my TNT patterns.  I consider the patterns in Sew U Home Stretch my knit block patterns, as they are simple, I know they fit, and they are easy to draft from for making variations.  I'm working on a woven dress block so that I can draft variations there, too, but I'm still perfecting the muslin.  But my knit block pattern was all I needed for this project. 

So, please meet THE CURVY COLOR BLOCK KNIT PENCIL SKIRT!!


I based this design on my corsetted pencil skirt, which has been really popular with clients (I think I've now made this skirt for five different people).

And because I like y'all so much, I'm going to show you how to do it.

TUTORIAL

Supplies
Knit skirt block with waistband
2 or 3-inch elastic
Ballpoint/stretch sewing needle
Tracing/drafting paper (you need to see through it)
Medium to heavy weight knit fabric - I used two ponte knits from GorgeousFabrics.com
Lining fabric (optional - I used a knit tricot)
Seam gauge or measuring tape
Ruler

Draft Color Block Skirt
STEP 1: If you don't have this marked already, modify your skirt block to a pencil skirt.  I have a mini-tutorial on this here.


STEP 2: Take pencil skirt front pattern piece and place marks 3 inches in from the side seam all the way down to the hip line. UPDATE: For larger sizes, I have found that it's best to measure in thirds. You want the color block inset to take up about two-third of the skirt. On your quarter-block, measure across the waist and hip lines. Divide these numbers into thirds. So if my quarter-waist measurement is 8, I would place a mark about 2.75 inches in from the side seam at the waist. If my quarter-hip measurement is 11, I would place a mark at 3.75 inches from the side seam at the hip.

STEP 2: Place a mark 5-6 inches in from the side seam at the hem (remember to mark in from the pencil skirt line if you have simply drawn that on top on your regular block).  Using a ruler or other straight edge, draw a line between this mark and the 3-inch mark at the hip line.

STEP 3: Connect dots, smoothing out line at the hip.  Feel free to play with the line to make it more curvy or straight. If you have a French curve or hip curve, use it!

STEP 4: Repeat with pencil skirt back.  Your skirt blocks should now look like this:


STEP 5: Use tracing paper to trace your four new pattern pieces (center front, side front, center back, side back).  Make sure to add a grainline on the side front and side back pieces.  I do this simply by measuring over from the center front/back fold.

STEP 6: Add seam allowance to all your pieces.  I usually use 1/4" or 3/8" on knit fabric when I have already tweaked the pattern for fit.  Since I wanted a 3-inch elastic waistband and my skirt block only allows for a 2-inch waistband, I marked 1 inch lower on the waist to remind myself to cut there.  Your four pattern pieces will look something like this:


Hello, Toes!


Cut and Assemble Skirt
You probably already know how to do this because you've made this skirt before, but I'll walk through the steps in order to highlight how to sew this new shape.

STEP 1: Cut skirt and waistband pieces.  If you aren't sure which side of a solid knit/jersey fabric is the "right" side, hold onto the selvedge sides and pull across the cut edge.  The fabric will roll to the right side.  If you are using 3" elastic, the size of the waistband will be (your waist + 3/4") x 7".  For 2" elastic, the width will be 5". This allows for a 1/4 - 3/8" seam allowance plus a touch extra.

For my waistband, I wanted the color block design to carry through the waistband.  I cut four pieces (center front, center back, two sides) and just measured the top of the skirt color block pieces to know how wide to make each section.

Note: Place a mark at the hip line on your center front/back, and side front/back pieces.  This will make it easier to match up the skirt pieces in the next step.

STEP 2: Pin and sew front/back side pieces to front/back center pieces.  This step might feel wrong when you are doing it, as you'll be matching a concave curve to a convex curve.  Pin the hip mark first, then top and bottom, then the rest.  Feel free to use a lot of pins on the curves (I did).  You'll notice that the fabric won't lie flat - that's okay (see third photo).  As long as the fabric is flat within your seam allowance (this is why having a small seam allowance is helpful), all will be well in the end.


If you have a walking foot, this is a good time to use it.  I like to sew with a long stitch on my regular sewing machine then serge over the seam with my serger.

Press seams - this should take out any remaining ripples.

STEP 3: Pin and sew side seams.  Place front section on back section, right sides together, matching hip marks.  Pin and sew with long stretch stitch on sewing machine or with overlock stitch on the serger.

STEP 4: Sew waistband.  Fold waistband right sides together, matching short sides.  Pin and sew.  Press seam open or to one side.  Fold waistband in half along long side and press.

STEP 5: Attach waistband.  Divide skirt into 8 equal sections and mark with pins.  Divide waistband into 3 equal sections and mark with pins.  Place waistband over skirt, right sides together matching pins.  Pin in place.  I like to have the waistband seam at center back.  Sew around waistband leaving a 2-3 inch opening at center back to insert your elastic.  You may need to stretch the waistband slightly as you sew to match the skirt.

If you have a color block waistband, then you'll simply need to match up the sections.

STEP 6:  Cut and insert elastic.  Hold elastic around your waist to determine how long you want it.  The elastic should be slightly stretched.  Overlap by 1/4 - 3/8" for seam allowance.  Attach a safety pin to each end.  Use one safety pin to feed the elastic through the waistband and use the second safety pin to secure the other end to the skirt (so that you don't accidentally pull it all the way through - very annoying).  This is harder to do with 3" elastic, but you'll get there.  Once the elastic is all the way through, overlap the ends and pin.  Sew ends together with a zig-zag stitch and trim off excess elastic.

STEP 7: Finish skirt.  Pin opening on the waistband to the skirt and finish this seam.  Try on the skirt and determine where you would like the hem.  Fold and press hem allowance and stitch the hem.  You can stitch the hem with a straight stitch, zig-zag stitch, blind stitch, or coverstitch (I used the coverstitch on my serger). Now put on the skirt and feel curvy!


I don't know why I am looking up, unless I'm worried about
bird poop - that tree behind me is full of birds.

My attempt at looking curvy.

And finally a word on the fabric I used.  I bought this ponte knit over a year ago from GorgeousFabrics.com thinking it would make a fun pencil skirt.  When it arrived, I liked it, but the thought of that bold, strong print swaddling my lower half was too much.  It sat around in my stash and I'd look at it every now and again and think, "How do I tame you?"  Finally this design idea came to me.  It was a "duh" moment (no angels singing opera) since I've seen about a million color block options online and this silhouette has been in my arsenal for a while now.  But I'll take "duh" for inspiration.  The black fabric came from GorgeousFabrics.com and you can find it here.  I lined the skirt with a black knit tricot that I also purchased from GorgeousFabrics.com (this isn't in stock but they have other knit linings).  I thought long and hard about where I placed the print on for the front and back pieces - I did not want to shine a spotlight on certain anatomical features!

Let me know if you have any questions and I'll add more construction photos the next time I make this skirt - I'm already scheming to make another version with this fabric (ponte knit and yes, it was also purchased from Gorgeous Fabrics - you can tell where I do most of my online shopping!):


If you make your own version of the skirt, please send me a picture or a link to your blog - I'd love to feature it!

School Projects

6/6/13
Belly, my oldest daughter, finished her first year of school last week.  Kindergarten - check, onto First Grade!  I wanted to make gifts for her teachers but when you include aids and specials and that meant eight gifts.  I left this 'till the final week to do, so this meant something pretty quick. 

Belly's contribution:


My contribution:


Zippered pouches for aids and specials

Book totes from apple corduroy for her main teachers
 
I figured her two male teachers wouldn't want a pretty little zippered pouch so they got Chipotle gift certificates instead.  The only simple male sewing project I could think of was boxer shorts and that didn't seem appropriate!


To save time, I interfaced the pouch fabric with a fabric-like fusible interfacing (Pellon SF101 shape-flex woven interfacing) instead of lining them.  I sewed the pouches up on my fancy serger using a piping foot to attach the zippers, and each one only took about 15 minutes from cutting to fusing to sewing. 


I also just hit my one year milestone with teaching sewing.  I teach primarily at The Little Bits Workshop in River Forest (if you're local and you want to take a class, go here) and I really liked the skirt project I led on Monday night.  I've found that while students dream about sewing their own clothes, I have trouble filling those classes with students opting instead for simple home dec project classes.  I had a group of students from my last beginner sewing session who were a bit more gung-ho, so I put together a one-night class to teach them to make a simple jersey skirt. 

My inspiration was this skirt, which I found on Pinterest, but I changed the drafting formula and the waistband:


Elle Apparel Socialite Skirt - tutorial

I made a couple sample skirts (I'm wearing the stripey one as I type), one with pleats and one without:


Keep in mind that my students have only been sewing for about a month and not all of them even have a sewing machine at home.  Here's what they made in three hours, from drafting to cutting to sewing jersey fabric for the first time:


You can't see it in this photo, but Nora did a fantastic job matching stripes!
My mantra through the class was, "Your first skirt won't be your best skirt," but they turned out really well.  I can't wait to see what their second and third skirts look like!

Birthday Present, Part 1

2/15/13
So today is my birthday - yay!  I love birthdays, my own and everyone else's.  I have a couple of birthday surprises to reveal and this first one is from me to the online sewing community.  I have teamed up with Rhonda from Rhonda's Creative Life and I have offered up a tutorial for my Zippered Scraps Wallet as a part of her Fabulous Free Pattern Friday series.  Go check it out!


Free Sewing Tutorial: Draft a deep cowl neck top

5/3/12
UPDATE: I've added a post about drafting a facing for this cowl neck here.

My tutorial on drafting a high cowl neck top has had a lot of pageviews in the last week (this always makes me happy).  So at the request of at least one reader (see? that's all it takes with me!), I'll show you how to draft a cowl neck top starting with a pattern that has a dart.  This will produce a deeper cowl neck like this one:


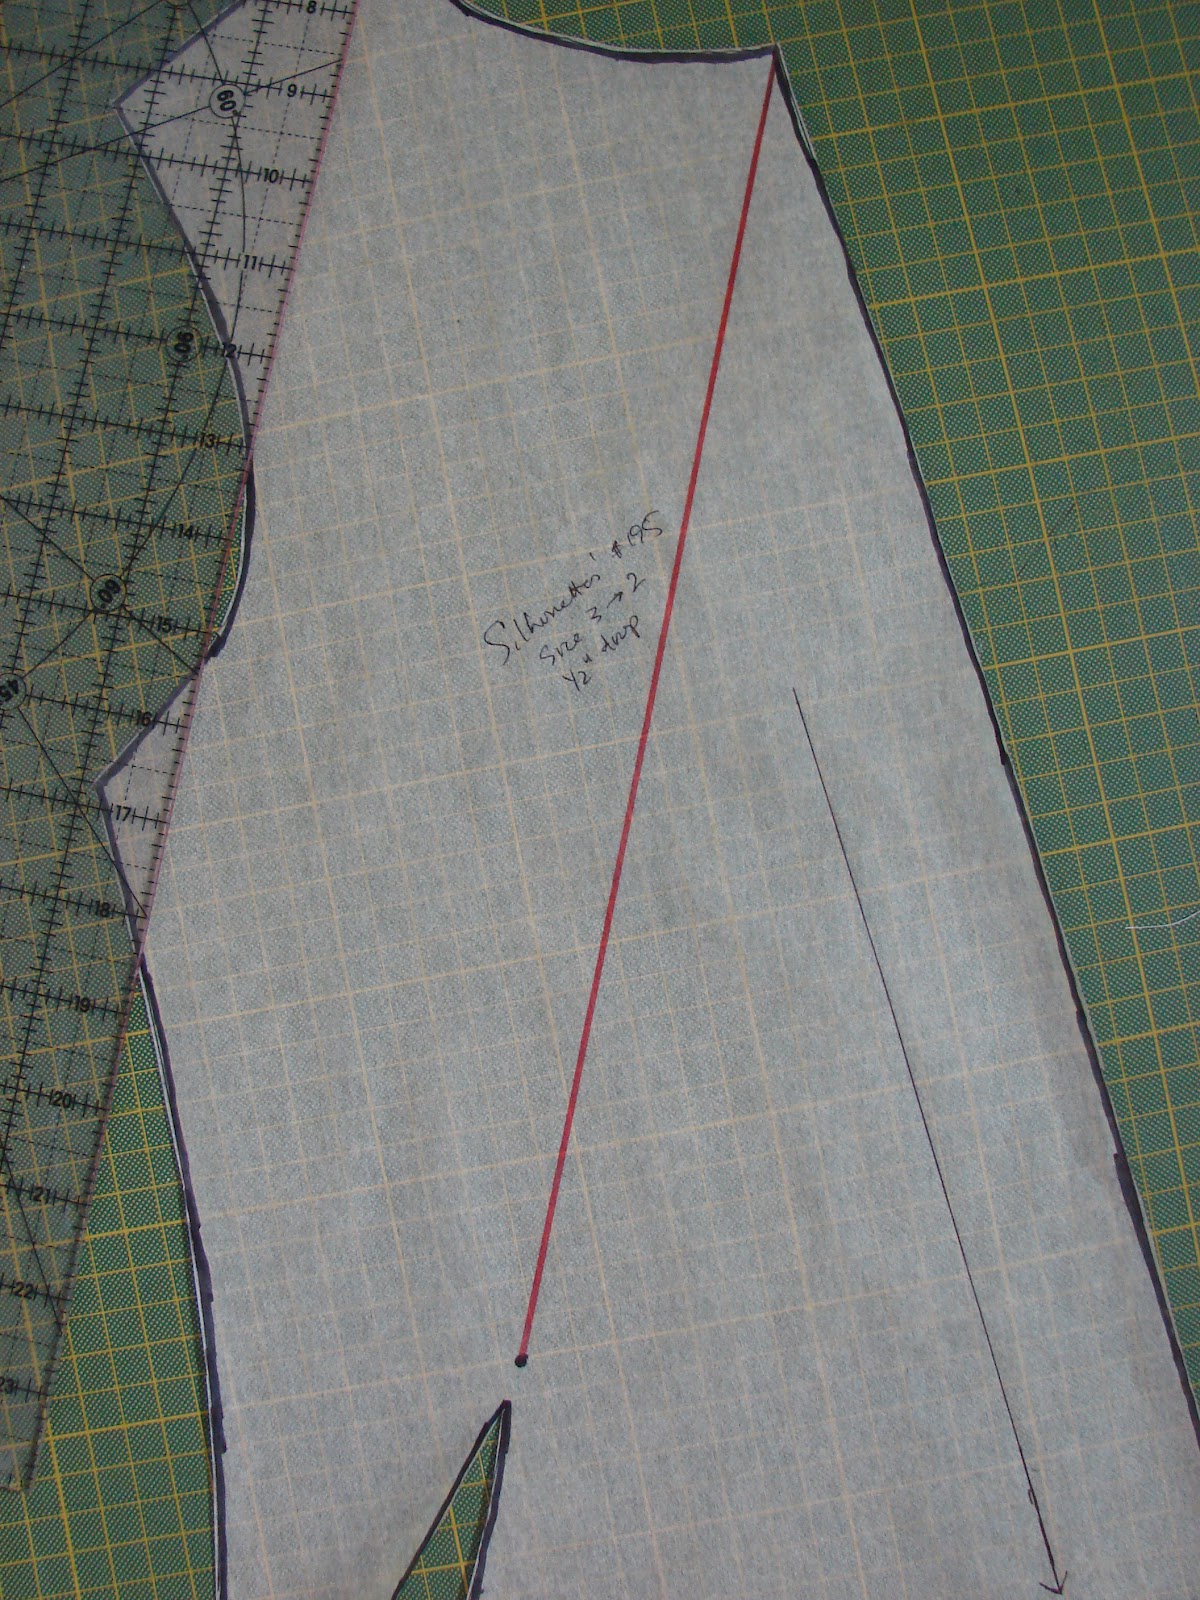
I started with Silhouettes' Pattern #195 as I have already made alterations to the pattern for a good fit (changed shoulder slope, took in waist/hip as they are smaller size than my shoulders).  It has a French dart, but these instructions should work regardless of where you dart is placed.

And I need to give a big thank you to Peggy Sagers for her help in figuring out how to draft this pattern (from Silhouettes).  I took a couple of classes with her at the sewing conference I went to recently (Original Sewing and Quilting Expo) and she encouraged people to contact her with questions.  So when I was trying to figure out what to do with the dart, I emailed her.  Within a couple of hours I got a very helpful response.  And this was on a Sunday.

Materials
*1 - 1.5 yards of drapey fabric with stretch (jersey, knit, stretch charmeuse, maybe even stretch poplin)
*Tracing paper (I use Bienfang Canary Sketching and Tracing Paper, the 50 yard/24" roll)
*Clear ruler
*Top/bodice pattern with a dart


Step 1: Move dart to neckline.
Trace your orginal pattern onto another sheet of tracing paper as you'll need to do a lot of cutting.  To move the dart to the neckline, draw a straight line from the dart point to the center front neckline.


Now cut along this line until you are about 1/8" away from the dart point (this will be your "hinge"). 


Now close and tape the orginal dart which will cause the pattern to spread at the new dart point.  It should look like this:


All right!  Step 1 is done.  You have moved a dart!


Step 2: Cut & spread neckline
Draw a curved line under the neckline, 1.5 inches down from the original. Cut along this line until you are about 1/8 inch from the shoulder line.

Draw two lines that meet at a right angle on a new sheet of paper. Place your cut pattern piece along the top line on this piece of paper. Spread the neckline so that both points touch the top line. Angle the remaining bodice so that the bottom center front corner touches the side line. Tape into place.  If that sounds confusing, it isn't - I think it's just easier to understand with a picture:


Smooth out the angle created at the shoulder line:


(Please ignore the second layer of pattern - that was my first try and it wasn't correct so I just taped take 2 over the top.)

Step 2, check!


Step 3: Turn half pattern into full pattern
You need to cut on a bias for this design, so you will need a full instead of a half pattern. Take a big piece of tracing paper and draw a T with lines meeting a right angles. Trace your half cowl neck pattern onto one side of the T and then flip and trace it onto the other. It should look like this when you are done:


I know this looks like something that would never fit a human body, but trust me, it will work!  And please ignore the wide band in the middle - I had to tape two pieces of tracing paper together to get one that was big enough.

Good work - the hard parts are all done!

Step 4: Place and cut your fabric
Spread out your fabric. Place the front pattern piece on the bias and the back pattern piece on the straight grain. It will look like this:


Cut and sew the top as you would normally.  You can serge the edges, turn them under by 1/4" and topstitched them into place or leave them just serged for an edgier look  You can add any kind of sleeve or even a hem band.  This top will fit and look great.  Devon calls this my sexy top and looks suspicious when I wear it out with friends!


Free Sewing Tutorial: Draft a Cowl Neck

4/19/12
UPDATE: I added a tutorial for drafting a facing for a cowl neck top here.

UPDATE: You can find a tutorial for the deeper cowl neck here.

I have a simple t-shirt/shell pattern that works well for me but I have enough basic tops - I want something fancier!  I love the high cowl neck look that is going around these days: 

Pinned Image
DKNY from macys.com
Pinned Image
LRK from saksfifthavenue.com

I wanted to make this look without having to shell out money for a new pattern and I couldn't find a free tutorial online that was really what I wanted.  So I hid out in my sewing lab and figured it out!  I use a lot of online tutorials in my sewing so I'm always happy when I have something to share with all of you.  Here's what I created:


Materials
*1 - 1.5 yards of drapey fabric with stretch (jersey, knit, stretch charmeuse, maybe even stretch poplin)
*Tracing paper (I use Bienfang Canary Sketching and Tracing Paper, the 50 yard/24" roll)
*Clear ruler
*Top/bodice pattern that you like (if you don't have one, there are plenty of tutorials online that will show you how to create a pattern from a t-shirt or top that you have in your closet, like this one).

Step 1:  Cut & spread neckline
Trace your front bodice/t-shirt pattern onto a new sheet a paper; you need to cut the pattern so you don't want to ruin your master.  Draw a curved line under the neckline, 1.5 inches down from the original.  Cut along this line until you are about 1/8 inch from the shoulder line.

Draw two lines that meet at a right angle on a new sheet of paper.  Place your cut pattern piece along the top line on this piece of paper.  Spread the neckline so that both points touch the top line.  Angle the remaining bodice so that the bottom center front corner touches the side line.  Tape into place.  This sounds harder than it is so don't fret!  It should look like this:


Smooth out the angle created at the shoulder line:


Step 2: Turn half pattern into full pattern
You need to cut on a bias for this design, so you will need a full instead of a half pattern.  Take a big piece of tracing paper and draw a T with lines meeting a right angles.  Trace your half cowl neck pattern onto one side of the T and then flip and trace it onto the other.  It should look like this when you are done:


It looks a bit odd, doesn't it?  Trust me, it works!  Imagine that super wide neckline draping in the middle because this is what will happen.  (Ignore the wide band in the middle of my pattern piece - my tracing paper wasn't large enough so I had to tape two pieces together with masking tape.) 

Draw a new grainline that is at a 45 degree angle to the center line.

Step 3: Place and cut your fabric
Spread out your fabric.  Place the front pattern piece on the bias and the back pattern piece on the straight grain.  It will look like this:


Cut and sew the top as you would normally.  I have left the edges serged and turned them under by 1/4" and topstitched them into place - your choice.  I added a band to the bottom for this top but you could do a simple hem or leave the hem unfinished.  However you finish it you now get to glow with pride everytime you wear it because you drafted the pattern and put it together on your own!


I also drafted a cowl neck from a pattern that had a bodice dart which made for a deeper cowl.  I'll post instructions for how to do this if there's interest - leave a comment if you want it!


Credit:  I generally followed instructions I found in Adele Margolis' book Make Your Own Dress Patterns.  I strongly recommend this book if you are interested in learning about drafting patterns.